
The Crucial Role of Details in Pump Installation
- Adnan Siddiqui
- Jan 15
- 6 min read
While pump installation might seem straightforward enough for anyone to undertake, it's a process with significant implications for the longevity and efficiency of the system. This is true for both vertical and horizontal pumps. The following eight installation concerns are essential to ensure optimal performance of your pump. While this post doesn't cover every potential issue, it highlights the eight most common installation problems that can lead to premature failure of rotating equipment.
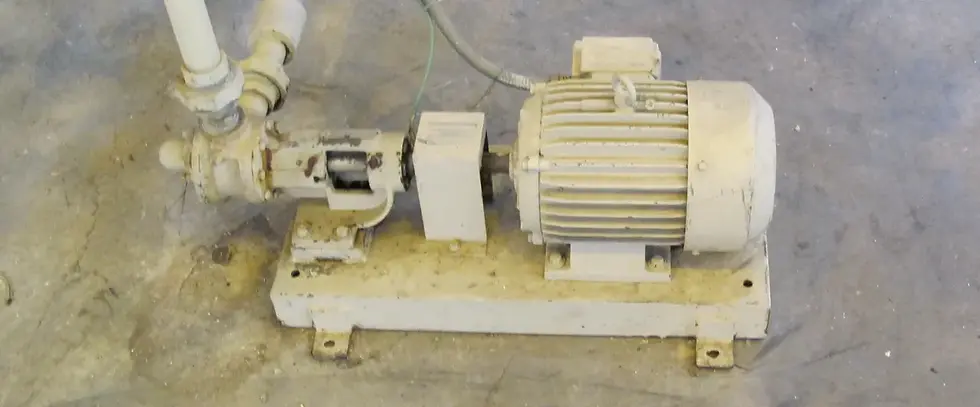
The following picture shows a pump that is not anchored down. This is obviously an incorrect installation.
Pump manufacturers often scrutinize the installation of a pump before honoring a warranty claim, and with good reason. Regardless of the quality of the pump, driver (be it a motor or a turbine), coupling, gearbox, etc., none can withstand the detrimental effects of vibrations caused by a poorly executed installation. Let's delve into the eight areas of concern that are pivotal for a successful pump installation.
The Big 8: Key Installation Concerns
The following eight areas highlight crucial installation concerns that, if not properly addressed, can severely compromise the integrity of an otherwise perfectly specified pump. Our lead technicians have witnessed firsthand the consequences of neglecting these items. For example, we once observed a pump that ran for mere minutes before its center bearing seized up due to improper alignment caused by thermal growth.
The inspection of the following items is often overlooked while removing the pump from service. The "pull" in a "Push/Pull" job is frequently neglected in the repair process. However, this is the only opportunity for technicians to note the details of the pump installation. If unusual wear is found during the repair process, there are records of how the installation was executed prior to removal of the pump assembly. Here are the eight crucial items to inspect:
Item 1: Base / Sole Plate Condition
A thorough inspection of the baseplate or sole plate (hereafter referred to as the baseplate) is crucial for ensuring the proper operation of a pump. Like any structure, a pump is unlikely to function correctly if resting on a faulty foundation. The baseplate should be level, not have settled, and be free of cracks, whether it's set in grout or bolted directly to concrete. It should also be free of excessive corrosion.
The baseplate must be securely fastened to the foundation with anchor nuts that are properly torqued, ensuring the foundation remains stable without movement or vibration. For pumps with a baseplate installed on grout, it's essential to check the grout for any cracks and voids. The concrete pad beneath the pump should be proportionally large and solid, providing a level foundation that is free of movement.
Additionally, the condition of any shims used in the installation needs to be evaluated. Any shims that are loose, corroded, or missing must be reinstalled or replaced if damaged.
Item 2: Soft Feet
"Soft feet" is a term used to describe a pump with loose footing, which can be problematic if the movement is out of specification. When removing a pump from service, it's crucial to individually loosen each mounting point or "foot" and check for any movement. Any movement that exceeds the acceptable tolerance indicates a need for corrective action. Similarly, when reinstalling the pump, the installer must check each "foot" individually to ensure any movement is within specification. Foot stability is essential to ensure that the pump's alignment does not change during operation.
Item 3: Component Alignment (Pump, Driver, Coupling, Gearbox, etc.)
Ensuring the alignment of all components in the pump assembly is crucial, alongside verifying that the baseplate is level. The pump, driver, coupling, gearbox, and other parts must be correctly aligned, run true, and be properly spaced. Modern setups simplify this task by mounting all equipment on a single baseplate. However, even with this arrangement, it is necessary to adjust each piece of the assembly to meet the alignment and offset requirements.
Item 4: Distance Between Shaft Ends (DBSE)
Similar to component alignment, the Distance Between Shaft Ends (DBSE) is a critical measurement. This is the space between the pump shaft and the driver shaft, and it must be set according to the specifications of the coupling being used. It is also essential that both shafts rotate collinearly and on the same axis within the coupling. If the DBSE is not correct, any shift in the position of the pump or driver's shaft during startup, shutdown, or due to thermal growth can put excessive stress on the coupling or keyway, potentially leading to damage.
Item 5: Coupling Spool
In addition to checking the Distance Between Shaft Ends (DBSE), it's essential to verify that the coupling runs true and without excessive vibration. When removing the pump, if shims were used, their condition should be carefully examined for any signs of damage. Uneven wear on the coupling or signs of operation with excessive runout, along with damaged shims, indicate that the installation requires a thorough review before reinstallation to determine if changes are necessary.
Upon reinstallation, ensuring that the runout of the coupling is within the required tolerance is crucial for smooth operation and to prevent undue stress on the components.
Item 6: Flange Alignment and Spacing
During the disassembly process, it's crucial to check the flanges for excessive stress, which is indicated by movement when they are unbolted. Once all the bolts are removed, the gaps between the flanges should be inspected to ensure proper spacing and alignment with the pump casing flanges.
Poor flange alignment not only complicates installation but also leads to uneven and undesirable stresses on the pump assembly. If your maintenance technician resorts to using a come-along to align the flanges, it's a clear sign that the maintenance procedures need to be either more closely followed or updated to prevent such issues.
Item 7: Thermal stresses
Even with proper pump and flange alignment during installation, thermal stresses can still induce misalignment. This occurs when the pump operates at temperatures significantly higher or lower than ambient, causing thermal expansion or contraction of the piping due to temperature changes. Such movement is the reason loops are incorporated into process piping. In a pump installation, this thermal movement may push the pump out of alignment or induce excessive stress on the pump casing. Although the root cause is different, the net effect is similar to that of a pump with poorly aligned flanges.

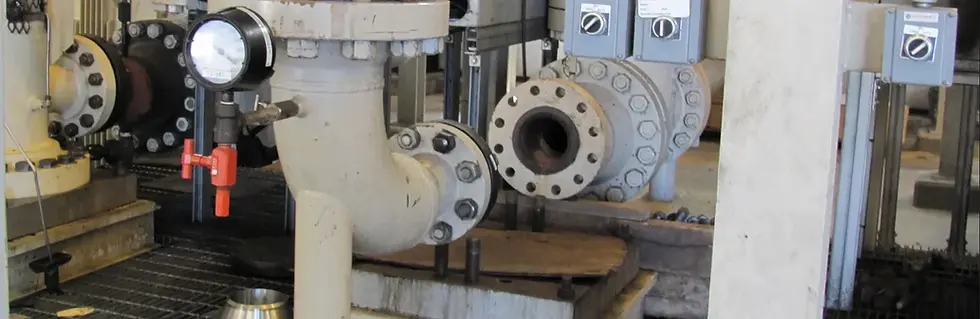
This picture is of a pump leaking hot fluid… is the origin of the leak from thermal growth as the DOWTHERM™ heats up the casing or from the poorly designed seal (item 8)?
Item 8: Seal design and Arrangement
The design of a seal should be carefully reviewed to ensure it provides adequate flow and flexibility. Seal design is a complex aspect of pump engineering, particularly as the EPA continues to focus on reducing fugitive emissions. The seal system design should allow for minimal flow restrictions, ensuring that the seal fluid maintains a high enough pressure and flow rate to:
Provide cooling and prevent contamination of the fluid.
Prevent escalation into a larger incident in the event of a seal failure.
In addition to designing the system for proper flow and pressure conditions, a seal must also be installed and aligned with the pump to minimize vibrations and reduce wear and tear on the seals and the sleeves in which they operate.
Note: While this is not an exhaustive list, neglecting the Big 8 items often leads to premature pump failures. It's crucial to address these concerns to ensure the longevity and optimal performance of your pump systems.
Over the Long Haul, Systems Beat Out Training
While the expertise of a trained technician is indispensable for a successful pump repair, even the most skilled technician cannot ensure consistent quality across hundreds of repairs without a comprehensive system in place. A time-tested pump repair system is crucial to ensure that every detail is meticulously checked for each installation.
Before removing a pump or completing the installation of a rotating assembly, certain items should be verified. For instance, it is practically impossible to check the Distance Between Shaft Ends (DBSE) of a disassembled pump sitting in the shop. Although not always standard practice, we advocate for recording all inspections and comparing them against the relevant specifications, whether they are OEM or API standards. Ideally, any deficiencies should be rectified before the equipment is returned to service, or at the very least, reviewed with competent personnel to assess their impact on the safety and longevity of the equipment and the well-being of plant personnel.
Work with Southeast Texas Pumps
We have a comprehensive checklist that breaks the big 8 into 16 detailed checklists. Each of our repair teams is trained to thoroughly use these checklists to augment their experience and ensure that your repair is done completely and correctly the first time.